|
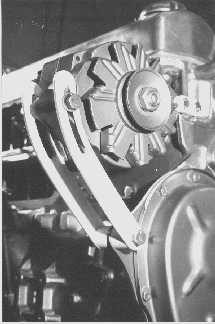
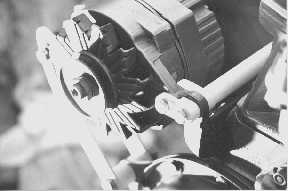
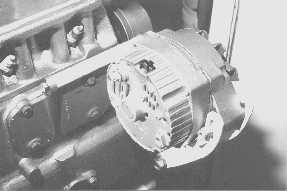
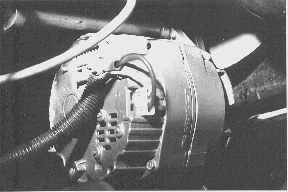
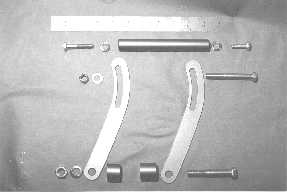
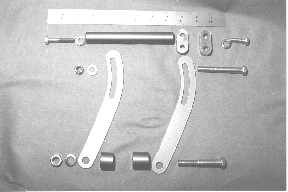
By Don Lenschow NTAHC The generator on your Healey has an out put of about 36 amps (or less). If you want your battery to stay charged and be able to run other things, consider converting to an alternator. The alternator used for this conversion can be purchased at any auto supply house. It is a Delco internal regulated negative ground unit. Therefore you must change to negative ground or have the diodes changed by a rebuild shop to run a positive ground system. The following pictures show the ALT 2163 kit installed on a BJ8 engine.. The ALT 689 kit is for early cars and does not have the extra two brackets that hold the alternator to the front ear of the side plate. You can check which side plate you have by looking at the letters and numbers cast into the side plate. If they are AEC 689 then you use the ALT 689 kit. If they are AEC 2163 t, then you use the ALT 2163 kit. This conversion does not require any permanent modifications, therefore you can change back to original at a latter date. The installation instructions are shown after the pictures.
ALT 689-Alternator installation instructions Check the numbers on your side plate- if it has AEC 689 in raised letters cast on the plate, you have the correct alternator kit. If it has AEC 2163 you have the wrong alternator kit.(you need the ALT 2163 for latter cars or side plates). Disconnect your battery. Remove the generator from side plate. Remove double shoulder bolt that holds adjustment brackets on bottom of generator. This is the strange bolt going through the steel plate on the front of the engine. Check the spacer that bolts between the two ears on the side plate for a snug fit between the ears. If it is too tight clean the paint from spacer and ears on side plate. If it is still too tight just remove some material from the end of the spacer. with a file This spacer is very important- it must fit snug so you do not put stress on your side plate ears causing them to break. Insert this spacer between ears on side plate and screw 5/16" diameter bolt in through rear ear and into spacer, finger tight. Now assemble the two brackets with the slots cut in them- Insert the 7/16 diameter bolt through the hole on end of bracket- slide the (longer) 1" diameter bushing on 7/16" bolt. Then insert this bolt and bracket through the hole you removed the strange bolt from. This assembly should be on the front side of the steel plate of the engine. Place the 1" diameter bushing (shorter one) on bolt and then assemble other bracket on this bolt. Assemble lock washer and bolt finger tight. The
threads in the small ear of the Delco alternator must be drilled
out with a 21/64" drill. This will allow clearance for the
5/16" bolt that threads into the front of the spacer installed
between the side plate ears. Place alternator with wide ear between
the two slotted brackets and insert the 3/8" diameter bolt
with a flat washer on each end. Thread nut on this bolt finger
tight. Place a washer on the long 5/16 diameter bolt and insert
it through the small ear on the alternator and the front ear
on the side plate. Screw this bolt into the spacer on the side
plate. If the ear on the alternator and side plate do not let
these holes line up you must either remove material from the
alternator or from the ear on the side plate. Because the side
plate is a casting the hole may be more to the side toward the
engine After you have a free fit of these holes, finger tighten the bolt. Install fan belt and tighten all nuts to achieve the proper belt tension and alignment. From here on you are on your own for making wiring changes, but I have included a diagram as a starting point. Do not forget to switch you battery terminals to a negative ground. Swap coil leads and reverse diode in fuel pump or go to an electronic fuel pump, such as the Hendrix electric fuel pump for only $89.95 postage paid. Notes: I suggest a Delco SI 10 alternator with an internal regulator. (about a 72-on Chev) . Some people have taken the guts out of their old regulator and made it into a buss bar for connecting all the brown wires. While you are wiring all this up it would be a good time to install some extra fuses too. ALT 2163-Alternator installation instructions Fan belt must be one size larger with this kit NAPA #15455 7/16X45X1/8 Check the numbers on your side plate- if it has AEC 2163 in raised letters cast on the plate, you have the correct alternator kit. If it has AEC 689 you have the wrong alternator kit.(you need the ALT 689 for early cars or side plates. Disconnect your battery. Remove the generator from side plate. Remove double shoulder bolt that holds adjustment brackets on bottom of generator. This is the strange bolt going through the steel plate on the front of the engine. Check the spacer and ear bracket that bolts between the two ears on the side plate for a snug fit between the ears. If it is too tight clean the paint from spacer and ears on side plate. If it is still too tight just remove some material from the end of the space with a file. This spacer is very important- it must fit snug so you do not put stress on your side plate ears causing them to break. Insert the long spacer between ears on side plate and screw 5/16" diameter bolt in through rear ear on side plate and into spacer, finger tight.Insert ear spacer without the notch milled in it between the front end of the round spacer and the front ear on the side plate. Place other ear spacer with notch milled in it on the front ear of side plate and insert 5/16" bolt. The bolt should go in the end that is the thickest. Now assemble the two brackets with the slots cut in them- Insert the 7/16 diameter bolt through the hole on end of bracket. Slide the (longer) 1" diameter bushing on 7/16" bolt. Then insert this bolt and bracket through the hole you removed the strange bolt from. This assembly should be on the front side of the steel plate of the engine. Place the 1" diameter bushing (shorter one) on bolt and then assemble other bracket on this bolt. Assemble lock washer and bolt finger tight. The threads in the small ear of the Delco alternator must be drilled out with a 21/64" drill. This will allow clearance for the 5/16" bolt that holds alternator between ear brackets.. Place alternator with wide ear between the two slotted brackets and insert the 3/8" diameter bolt with a flat washer on each end. Thread nut on this bolt finger tight. Place the small ear of the alternator between the ear brackets, insert a 5/16 bolt through. both ear brackets and alternator. Thread a 5/16-18 nut on this bolt. Because the side plate is a casting the hole may be more to the side toward the engine. After you have a free fit of these holes, finger tighten the bolt. Install fan belt and tighten all nuts to achieve the proper belt tension and alignment. From here on you are on your own for making wiring changes, but included is a diagram as a starting point. Do not forget to switch you battery terminals to a negative ground. Swap coil leads and reverse diode in fuel pump or go to the Hendrix electric fuel pump for only $89.95 postage paid. Notes: I suggest a Delco SI 10 alternator with an internal regulator. (about a 72 on- Chev). Some people have taken the guts out of their old regulator and made it into a buss bar for connecting all the brown wires. While you are wiring all this up it would be a good time to install some extra fuses too. |
|
Greensboro, N.C. 27403 (336) 852-8909 |
|
|
|
|
|
|
|