
|
How to..... Reversing Polarity or Make your Healey think negative Article submitted by Dale Beal - reprinted from Dec. '83 Sports - GT Market |
|
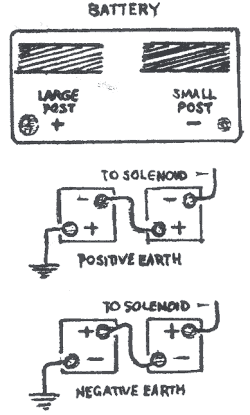
Somehow, when the British started making automobiles, they managed to install the wiring harness upside down or backwards. In doing this they invented "positive ground electrics". This novel approach to wiring has obvious drawbacks in the modern world of cassette radios, CB, and other automotive accessories powered by 12-volt negative ground using the following step-by-step instructions. The entire process should take about 1 hour. #1. REVERSE
THE BATTERY (S) |
 |
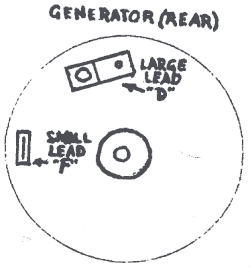
| #2. POLARIZE THE GENERATOR Remove the lighter gauge (usually brown w/green or yellow w/green on the early models) from the "F" (field) terminal on the back of the generator. Now, with a length of wire, flash between the "F" terminal and a hot lead. The hot lead can be the positive post of the battery, the hot lead on the fuse box or an "A" or "B" terminal at the regulator. Flash just long enough to see a spark! DO NOT LEAVE THIS CONNECTED, even for a few seconds. Just flash it a couple of times. Now, reconnect the wire to the back of the back of the generator. |
 |
|
#3. NOW START THE CAR and check to make sure the ignition light is working correctly. It should act just like it did before you started this project. The light should go off at about 1000 RPM. If the ignition light stays on when the car is turned off... IMMEDIATELY remove a battery clamp or the large wire on the generator or both! Some words of caution, the voltage regulator has a limited lifetime, and sometimes, if the unit is about ready to fail, the change in polarity will push it over the edge. |
|
#4. REVERSE
THE COIL CONNECTIONS At this point, you may want to test the other electrical items on your car. They include: A. The heater motor. B. The wiper motor. C. Ammeter/Voltmeter (if you have one, the connections must be reversed). D. The fuel pump. (Most are insensitive to polarity but some newer models and replacement pumps may require the connections to be reversed). If you have replaced the SU fuel pump in the last few years - one with a diode across the points, rather than a condenser - reverse the diode, or it will blow out. Or, replace the pump with a modern electric fuel pump and regulator, like the Hendrix lifetime warranty fuel pump for only $89.95. E. If you have installed a voltage inverter for the radio and such, it can be removed and the radio wired for negative ground. (Your inverter can now be sold or thrown away). |
|
F. THE
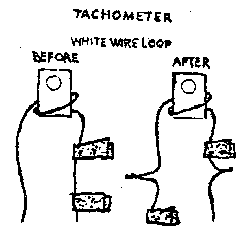
TACHOMETER A. The white loop comes from the key switch and travels to the hot side of the coil. Select one side of the wire and tag it with two pieces of tape spaced about 1" apart. Then cut the wire between the pieces of tape and also cut the other side of the loop. Reverse the connections so there is one piece of tape on each side and solder them. Tape the bare sections of wire. (Remember this is the power lead from the coil and is unfused). |
 |
|
B. To reverse the power wire and earth wire on the inside of the unit, it is necessary to remove the chrome ring, the glass face and the glare shroud. Then remove the two screws on the back of the unit that hold the internals to the case and allow the internals to drop carefully into your hand. DO NOT BEND THE NEEDLE! The spade terminal, which carried the green or white wire, is the power lead. Next to it is the ground connection. One of these leads is a resistor (looks like a cigarette filter with wires on each end). Disconnect the resistor from the lead it is hooked to and resolder it to the other lead. Likewise, disconnect the wire from that lead and connect it where the resistor was connected. In short, reverse the connections. Reassemble the unit (clean the glass). You have converted your Healey to negative ground. NOTE: Adjust the pot on the back of the tach for 3000 RPM using a dwell/tach unit while revving the engine to 3000 RPM on the dwell/tach. NOTE: Item #3, #4A and #4B, I did not have to do on my 100-4 or BJ-8, but check these steps for safety precautions. I did this procedure on 100-4 and BJ-8 that I drive daily and have had not problems. |
|
Greensboro, N.C. 27403 (336) 852-8909 |
|
|
|
|
|
|
|